Ah, burlap.

Why do I love burlap so much? I just do. I would use it in every room if I could. Check out Design*Sponge’s fabulous Thanksgiving table that incorporates it so tastefully. Click here!

On a side note, I’ve totally started decorating my house for Christmas. We don’t ever host Thanksgiving dinner at our house, so I figured it was safe, since no one’s coming my house and the occasional pop-ins aren’t really going to care I’m a few weeks early. BUT – burlap has been incorporated into this year’s decor. I’m loving it so much already. Can’t wait to share pics, post-Thanksgiving of course, for the blog world. ;-)

Happy Turkey Day, Y’all.

My coffee journey began when I was 20 years old and living in Madrid. I remember when my friends and I first arrived there for our study abroad semester, we thought it was so weird that lunch was two hours long. What do you do for two hours on your lunch break? Drink cafe con leche, that’s what. I learned to drink coffee in Europe, which just felt appropriate. Thus began my dream of the daily latte.

Every morning for the past three years, I have woken up with a delicious homemade vanilla latte. I heart vanilla lattes. Last weekend, as we were bragging about having an espresso machine and attempting to convince yet another guest to our house that it is the best purchase you’ll ever make (EVER), our friend calculated that we’ve saved over $7,000 in coffee by making our own lattes every day. Needless to say, we’re fans.

I eventually progressed from flavored creamers (ingredients you can’t pronounce) to the DaVinci syrups you buy at the grocery store (corn syrup)… but when I got sick of paying $5 bucks for a bottle of sugar water, I decided to figure out how to make it myself. One of the best things I’ve ever done. These are so ridiculously easy to make you’ll be embarrassed you’ve never done this before. And for pennies on the dollar.

Vanilla Syrup

1 cup Sugar (Regular White or Raw)
3/4 Cup Water
1 1/2 tsp. Vanilla Extract

Combine water and sugar in small saucepan and heat over medium-low. Stir occasionally until all of the sugar is melted. Let cool. Stir in vanilla extract.

When you mix this into your coffee, you use it instead of sweetener. I like to use raw sugar when I make it. Plus, the added bonus of making a syrup is that the raw sugar is already melted when you add it and instantly sweet. This recipe can also be used with Hazelnut or Peppermint extract, just experiment with the ratio of extract to simple syrup!

Quick post to share some pics! I’ve been having so much fun creating baskets… can’t wait to post to Etsy. I’m just about ready to listen to Christmas music but am restraining myself…I’ve totally gotten sucked into the early Christmas season. All this crafting!

Have you started any projects yet? Martha had an email this week that was “Christmas Crafts You Can Start Today.” Get inspired! There is nothing like the handmade for Christmas. Or, if that’s not your style, check out any of the MANY craft markets this season. I love buying handmade too and injecting a little boost into our local economy. Come see me this weekend in the Marietta area at Due West United Methodist Church! Over 40 crafters ready for the holidays. :) Click on the tab on my side bar for more info… (PS the basket at the bottom of this post is one of the Silent Auction items. I love it so much.)

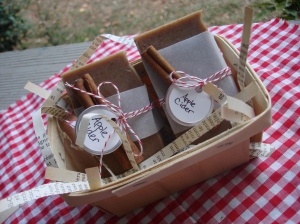
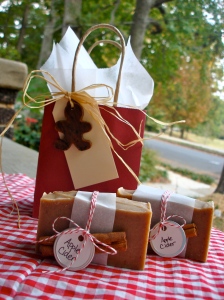
I’m already busy working away on my holiday soaps and gift sets. So busy, I can’t write much, but had to post a few of the first photos. All of which will hopefully be posted on my Etsy page by the weekend! Just had to share!

My new favorite scent, Apple Cider. The smell of fall!

Gift Bags!!! I'm so in love with the little soap gingerbread man...

New soap dishes, handmade and come as a set with a bar of soap!


I have my first market of the season this Saturday at Grayson High School in Gwinnett. It’s a fundraiser for their  basketball booster club (more info here) and will have 65 handmade artists showcasing and selling their products! If you in Gwinnett, come by and support handmade! I can’t wait!

I spent this past weekend in Jonesborough, Tennessee at the National Storytelling Festival. I travelled with some of my friends from 12Stone Church to take in the wisdom of expert storytelling from professionals. Did you know there are such a thing as professional storytellers? There are. And they are wonderful.

Storytelling is a lost art, especially among my generation, and to sit and soak in a good story, visualizing it as a teller recites his or her descriptive words, is mesmerizing. As founder of the festival Jimmy Neil Smith put it, “As millions of story lovers all over the world know, there is no substitute for the power, simplicity, and basic truth of a well-told story.”

I am inspired to begin to piece together some of my stories of my own.

While we were there, we stayed in this fabulous lake house on Lake Boone. We cooked dinner Saturday night and I made roast chicken with carrots. Always a big hit. My friend Amanda has a great recipe for the perfect roasted chicken. Read it here and maybe it’ll inspire her to get back in the blog world. She’s such a fabulous writer.

Found these at a big school sale. Got the pair for $15!

When the air turns crisp, all I can think about are Saturday mornings. I love fall Saturday mornings in Atlanta. The air is crisp, the sky the perfect shade of blue, and Atlantans are out and about, enjoying it all.

I suffer from the disease of wanting to do everything on my weekend “To-Do” list on Saturday morning. But not too early, and before I get hungry for lunch. Hence, I end up with a mile-long to do list I want to accomplish between 8:30 and 11:30am on a given Saturday. I’m obviously left disappointed week after week.

As often as I can, I forgo the chores and either enjoy my coffee on the front porch as I watch the park wake up, or hop in the car and head around town to check out the area garage sales. The fall is a touch and go season for garage sales; sometimes you luck out with people trying to clean house before winter hits, other times you just enjoy your coffee for the day on the road. Either way, its a great way to be outdoors. As we all try to savor the last few weeks of

Tell me you don't love these. Each about a quarter a piece.

fabulous weather (at least Atlanta and northbound), I’ve compiled a few tips and photos of my favorite finds to prove that sometimes one man’s junk truly is another man’s treasure. Enjoy!

1. Make a Master List of stuff you want to buy at garage sales/thrift stores. What do you look for at Garage Sales and Thrift Stores anyway? If you don’t go with a list, or at least a mental one, all you will see is junk. This keeps you focused and on the hunt. Here are things I always look for:

– Linens (cloth napkins, tablecloths, placemats, or sheets and blankets that could double as a table cloth.

Adorable plates. 8 for $2 bucks.

– Tea cups, coffee cups, and cute dessert plates. I love unique pieces or anything plain white. But a short list keeps me from overwhelming my cupboards.

– Storage opportunities. Living intown, my closet space is non-existent. I am always looking for trunks or furniture that can also double as storage.

– Old Mason jars. Obsession. I put everything in jars, and love saving the old-time clip ones for Christmas and birthday gifts. They’re never out of style.

One of my many projects. Great tray, waiting to be painted. Ugh!

2. Don’t buy a “project” if you have an incomplete one at home. Trust me, I have projects all over my house… it always seems like a good idea at the time, but pretty soon, all you’ve got are projects piling up, waiting to be put in a garage sale of your own.

3. Find the big sales. I intentionally research the private schools in Atlanta for annual yard sale fundraisers. Most of them have them, and they are GREAT. Charity yard sales are great because you find lots of parents/church goers who love the idea of giving their junk away to raise money for a great cause. They people who run them usually want to get rid of it all, too, so bargaining is also

Fabulous trunk I'd never have found in a store. $15 bucks.

a bonus.

4. When buying clothes: I love to buy clothes at thrift stores. However, it’s so easy to feel overwhelmed when you walk into your local Goodwill. I only look for certain clothing items second hand. Here they are:

– Blazers and jackets.
– Pants and Jeans
– Dress shirts

I only shop name brand items. I’ll flip through a rack in about 30 seconds looking for the name brand tags (I’ve found Gap, Banana Republic, and Ann Taylor before!). Then, I’ll assess whether or not it’s something I like. When shopping pants, only shop stores that sort them by size. It’s not worth it to look through a rack that has everything from 2 to 20.

4. Finally, have fun and pick up something cheap and hokey every now and then! But also be willing to walk away. Don’t overpay. Its at that garage sale or thrift store for a reason.

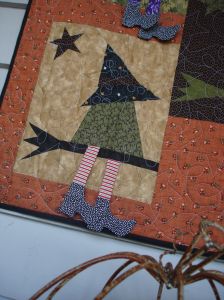
So excited to post some adorable quilted pieces my grandmother and great aunt made. They live in Eden, New York and quilt. These pieces just posted to Etsy are Halloween-themed and feature little witches with dangly legs. The legs add a whimsical feel to the quilts.

They are made to be wall hangings, but I think they would be a great little throw. I love how they look draped over my rugged rocking chair.

Oh fall, hurry up and come! I am ready!

View them in my shop HERE!

We have been having some fun with what’s known as “eco-friendly” handmade goods lately around the bike shop. One day on the porch, as some of the boys were sorting through a huge bin of old tubes we have, Tim had the idea of making a belt out of a bicycle inner tube.

Tada! An idea was born. Within 24 hours, Tim had picked up belt rings at the craft store, pulled out the sewing machine immediately and got right to work.

We’ve given them away to four boys whose pants were falling down. (And, we heard yesterday from one of the boys that he wore it to school!) P.S. I’m wearing one right now. Changing the ‘hood, one belt at a time.

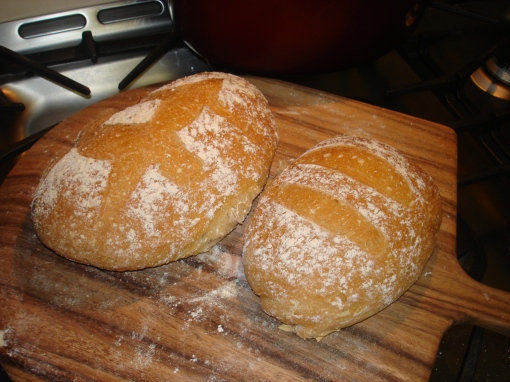
I’ve had a few people ask for the bread recipe you can make in advance and keep your refrigerator and pull out at will. We had this bread the other night and made chicken pesto sandwiches. It was crunchy and delicious. Here is the link to the basic recipe–find a tupperware container and jump in! Don’t be afraid to experiment; it’s simple enough you won’t be heartbroken if it doesn’t come out great the first time.

I’ve got weekend plans to try this with fresh herbs in the dough…perhaps some thyme and rosemary, celebrating the end of summer bounty before it disappears for the season.

The Master Recipe: Boule (Courtesy of Mother Earth News)

(Artisan Free-Form Loaf)

Makes 4 1-pound loaves

3 cups lukewarm water
1 1⁄2 tbsp granulated yeast (1 1⁄2 packets)
1 1⁄2 tbsp coarse kosher or sea salt
6 1⁄2 cups unsifted, unbleached, all-purpose white flour
Cornmeal for pizza peel

Mixing and Storing the Dough

1. Heat the water to just a little warmer than body temperature (about 100 degrees Fahrenheit).

2. Add yeast and salt to the water in a 5-quart bowl or, preferably, in a resealable, lidded container (not airtight — use container with gasket or lift a corner). Don’t worry about getting it all to dissolve.

3. Mix in the flour by gently scooping it up, then leveling the top of the measuring cup with a knife; don’t pat down. Mix with a wooden spoon, a high-capacity food processor with dough attachment, or a heavy-duty stand mixer with dough hook, until uniformly moist. If hand-mixing becomes too difficult, use very wet hands to press it together. Don’t knead! This step is done in a matter of minutes, and yields a wet dough loose enough to conform to the container.

4. Cover loosely. Do not use screw-topped jars, which could explode from trapped gases. Allow the mixture to rise at room temperature until it begins to collapse (or at least flatten on top), approximately two hours, depending on temperature. Longer rising times, up to about five hours, will not harm the result. You can use a portion of the dough any time after this period. Refrigerated wet dough is less sticky and easier to work with than room-temperature dough. We recommend refrigerating the dough at least three hours before shaping a loaf. And relax! You don’t need to monitor doubling or tripling of volume as in traditional recipes.

5. Prepare a pizza peel by sprinkling it liberally with cornmeal to prevent the loaf from sticking to it when you slide it into the oven.

Sprinkle the surface of the dough with flour, then cut off a 1-pound (grapefruit-sized) piece with a serrated knife. Hold the mass of dough in your hands and add a little more flour as needed so it won’t stick to your hands. Gently stretch the surface of the dough around to the bottom on four “sides,” rotating the ball a quarter-turn as you go, until the bottom is a collection of four bunched ends. Most of the dusting flour will fall off; it doesn’t need to be incorporated. The bottom of the loaf will flatten out during resting and baking.

6. Place the ball on the pizza peel. Let it rest uncovered for about 40 minutes. Depending on the dough’s age, you may see little rise during this period; more rising will occur during baking.

7. Twenty minutes before baking, preheat oven to 450 degrees with a baking stone on the middle rack. Place an empty broiler tray for holding water on another shelf.

8. Dust the top of the loaf liberally with flour, which will allow the slashing, serrated knife to pass without sticking. Slash a 1⁄4-inch-deep cross, scallop or tick-tack-toe pattern into the top. (This helps the bread expand during baking.)

9. With a forward jerking motion of the wrist, slide the loaf off the pizza peel and onto the baking stone. Quickly but carefully pour about a cup of hot water into the broiler tray and close the oven door to trap the steam. Bake for about 30 minutes, or until the crust is browned and firm to the touch. With wet dough, there’s little risk of drying out the interior, despite the dark crust. When you remove the loaf from the oven, it will audibly crackle, or “sing,” when initially exposed to room temperature air. Allow to cool completely, preferably on a wire rack, for best flavor, texture and slicing. The perfect crust may initially soften, but will firm up again when cooled.

10. Refrigerate the remaining dough in your lidded (not airtight) container and use it over the next two weeks: You’ll find that even one day’s storage improves the flavor and texture of your bread. This maturation continues over the two-week period. Cut off and shape loaves as you need them. The dough can also be frozen in 1-pound portions in an airtight container and defrosted overnight in the refrigerator prior to baking day.

I am in love with the homemade life. I am not shy about that fact, nor the fact that I find something deeply satisfying in creating things from raw ingredients. Last week, a friend of mine showed up to church with a few loaves of bread she was delivering to another friend. They were gorgeous golden brown, braided loaves, and instantly caught my eye. “Do you bake bread?” I asked. She replied that not only does she make bread, but she also grinds her own wheat.

This of course sent me into a frenzy. There may have been squealing.

I have been talking to more and more people lately who do this. I’m intrigued and ready to bring breadmaking into my life. I immediately asked for a lesson and it was set; Friday morning we would bake bread.

What a treat. We started early for my day off (9:00), so of course I gulped my coffee down on the way and showed up having not had breakfast. Susan toasted up some bread she had made earlier in the week, and we enjoyed that, almost as a precursor for what was to come.

Susan’s such a wonderful person. The thing I love about her most is how steady and relaxed she always is. She is a mom of five kids and I’ve never seen her frazzled. I love just being around her. I keep hoping it will rub off at some point… I will have to come take lessons from her when I have children.

We started with an artisanal bread dough she had in her refrigerator.

This is a boule dough that just keeps in an airtight container and, whenever you want to bake up a loaf, you pull it out of the refrigerator, shape it into a ball, and let it rise.

So we did just that.

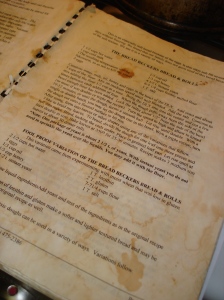
Then, we were onto the wheat grinding. Susan’s recipe book is my favorite kind–the kind that are so worn and loved that it’s covered in spills and stains. A book of memories, if you ask me. One of my favorite gifts ever was one I gave my mom last year for Christmas. Our family has a chocolate pie recipe, passed along from my great aunt and one my mom and I have made every year at the holidays for the past 20 years. Last year, I took the stained, worn recipe card that desperately needed retiring, and framed it. It now sits in her kitchen and is a wonderful memory to look at!

Back to the bread. Susan bought all of her bread making equipment 15 years ago from the Bread Beckers, which I am learning is Atlanta’s source for wheat and bread making products. Including this 5 gallon bucket of wheat that sweet Ellie was posing next to.

Susan turned on the mill with the jet engine. Sounded like it was 15 years old, but worked perfectly!

Ethan scoops in the grain!

Out comes the flour. All the goodness of whole wheat. Gorgeous.

Here the mixer in action. First time I have  seen something like this! The great thing about Susan and her bread making is that she just put me at ease. I’ve always been a little panicky about making bread. What if it doesn’t rise right? What if it’s tough and dense? It had gotten so bad, I had literally removed the thought of making homemade bread from my mind. Susan, again, wonderfully laid back, doesn’t stress when she loses count of how many cups of flour she’s put in.

She adds the warm milk and water when it ‘feels right.’ And she doesn’t time how long it rises.

She knows how it should feel, and let’s her instincts guide her actions. I am in awe.

After our dough for 6 loaves had risen, we tore it apart and began to braid.

Lovely.

Finally, they were done. The bread we made had eggs and milk in it, which made it extra chewy. The honey made it sweet. They. were. so. delicious. While I was writing this blog post, I just had another piece. My mouth was salivating looking at these photos!

So? I am no longer afraid of making bread. I will try it on my own this weekend! How about you? In your quest for the homemade life, what are you afraid of? What’s the one thing you need to do? (Or find someone brave to do it with!?)